14th May 2021
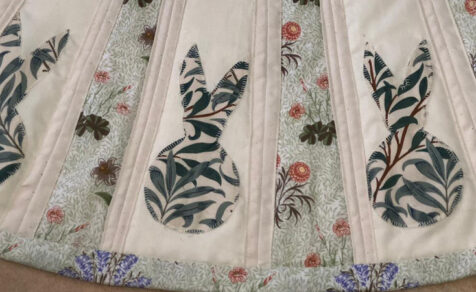
We hope you’re all well and keeping safe! With a staycation in mind, we created our latest craft; a William Morris fabric jewellery roll. It’s good to keep all your precious items together when travelling, whether (one day!) abroad or closer to home, we don’t like taking off our jewellery and leaving them around a room in case they get misplaced, so whether at home or further away, we hope you like our latest craft!

You can of course use whichever fabric you want for this project, we went with two of our Morris designs and one plain cotton. Using William Morris Eyebright and William Morris Merton, we used Eyebright for the inner pockets and features and bound it with the matching bias binding. The Merton as you can see, we used for the outer of the jewellery roll. Lined with a complimentary white cotton.


3. Start by sewing the zip to the side of your pocket, then using the pocket as your guide sew the zip to the white fabric. Pin the pocket so it is placed where it will be when finished.

4. Next fold over the top of the open pocket for your necklace and hem across the top. Then fold the side and bottom seams down .5cm and press so you can now hem them onto your white fabric. The right side of the pocket is placed 2cm from the zip and 2cm from the bottom of the fabric. Sew down three sides just leaving the top open.

5. Take the 13 x 8cm piece of fabric for your necklaces to hang from and length ways fold face to face, sew across the top and down the side.
6. Turn correct side out and fold in the raw edges .5cm, you will now have a tube. On the sewn end add a triangle of Velcro. On the folded end stitch to the white fabric so the velco end is 2cm from the zip and 2.5cm from the top edge. Stich the other piece of Velcro to the white fabric.
7. To make the ring holder stitch the 17cm by 7cm wide across the top and down one side, turning in the bottom .5cm so no raw edge is visible.

8. Turn through and put the seam to the centre back, then form the triangle at the top by holding down one corner, pin across so no filler can get in. Fill the ring holder with soft wadding until it is the width of your finger… keep testing by putting your ring on it until it fits snuggly. Fill leaving the last 1.2cm empty and tuck the corners in to make a triangle and stitch the Velcro triangle to the end.
9. Attach the top 1.2cm from the edge of the roll and 5cm from the necklace holder. Attach the other piece of Velcro to the white fabric.
10. For the earring holder take the 17 x 6cm piece of eyebright fabric and press in the .5cm hem all the way round. Sew the lace along the top side turning the ends under so it is down the centre of the fabric.
11. Place the lace and eyebright fabric onto the white fabric 3.5cm from the ring holder 1.5cm from the top and bottom edge and sew around 4 sides.

12. Next cut a piece of bias binding 73cm long and fold in the raw edges to the centre and press with an iron, then fold in the ends so you have no raw edges at either end and fold the length of the bias binding in half and press again. Now sew the length of the bias binding so you have made the tie for the jewellery holder.
13. Take the William Morris Merton fabric and find the centre, both length and width ways. Stitch the tie to the centre, back tacking a couple of times to secure.
14. Face down lay the Merton blue with ties pulled tight length ways put on top the wadding and the inner facing you to make a sandwich, stitch around the outline as close to the edge as you can, taking care not to stitch down the ties.
15. With the Merton blue fabric facing you pin the bias binding face down to the edge, starting by folding the bias binding end 3cm back on it’s self so no raw edges are visable once turned over. Stitch the bias all the way and again turn the bias back on its self, crossing over where you started so you don’t have a raw edge to finish.
16. Turn the bias onto the centre of the jewellery roll and turn under the raw edge and slip stitch by hand all the way around the jewellery roll until you get back to the start.
17. Roll and tie your jewellery roll, and you’re finished!
And there you go – a jewellery roll, ready for your next staycation, or to decorate your dressing table at home. After all, isn’t it lovely to keep all your beautiful jewellery in a floral case! We absolutely love this craft, and hope you do too! If you do make it, we’d love to see, remember to tag us on our Instagram @laurasbeau
Posted in Crafts from our Products! by Laura
Did you know that in Japan where our projects are sold, our tea towels are used not only for being functional but for decoration - we love that they’re framed, or laid on the table as a centrepiece to be admired or hung as a draped item to bring some nature indoors 🌿 we thought we’d do the same by using the tea towel as a centrepiece for a simple cup of tea and very delicious piece of cake! 🍰
•
•
•
#williammorris #morris #williammorrisfabric #fabric #fabrics #floralfabric #teatowel #cake #floraldesign #floraldesigner #victorianart #japanstyle #japan #teatowel

With so many timeless designs and writings, we think Morris achieved his aim, don’t you? 🫶🏻
•
•
•
#williammorris #williammorrisdesign #design #willowbough #quoteoftheday #quoteoftheday #quotestoliveby #preraphaelites #preraphaeliteart
Lazy Sunday mornings 💤 our William Morris Strawberry Thief tablecloths are now back in stock in all sizes if you fancy adding some floral magic to your table ✨ Hope you all have a lovely Sunday! 🩷
•
•
•
#williammorris #williammorrisfabric #strawberythief #victorianartist #victorian #preraphaelite #preraphaeliteart #morris
A beautiful day on the beach; we had to take our incredible small Compton tote bag to carry a certain someone’s special treats that we got from the lovely @nationaltrust shop, can you tell he was very happy with them! 😂🫶🏻
•
•
•
#williammorris #williammorrisfabric #williammorrisdesign #design #compton #totebag #nationaltrust #nationaltrustuk #northeastbeauty #labradorlove #preraphaelite
We’re going to have to look at this English summer through our rose coloured specs we think and set the table summery despite the rain!☔️🩷 We thought this made the perfect table setting; a bouquet with blooms out the garden wrapped in a Daisy napkin cone, doesn’t it look great! 🫶🏻 We’re going to put a small bunch at everyone’s seat and then they can take them home to enjoy at their houses 🌿
•
•
•
#williammorris #williammorrisdesign #williammorrisfabric #williammorrisfabrics #strawberrythief #napkins #floraldesign #florals #floraltabledecor #tablescape #daisy
✨ It’s the last day for 20% off our whole website! ✨ Use code: floralsummer at checkout on our website today only! 🫶🏻
•
•
•
#williammorris #williammorrisdesign #williammorrisfabric #williammorrisfabrics #fabricstack #fabricstash #floralfabric #florals #victorianart #preraphaelite
We’re thinking of selling our William Morris Daisy fabric by the half metre 🫶🏻 It’s a much narrower fabric than our usual fabrics, but we’ve had some customers interested in it in cotton and heavyweight for projects such as upholstery, curtain and dress making and quilting projects, what do you all think? ✨🌿
•
•
•
#williammorris #williammorrisdesign #williammorrisfabric #williammorrisfabrics #fabric #daisy #fabricstack #fabricstash #quiltingfabric #quiltingcotton
✨✨ Offer extended ✨✨ We forgot to give you warning that our 20% off code was expiring and we thought it would brighten up some rainy July days, so now until the 14th July, take 20% off our website using code: FLORALSUMMER ☂️
•
•
•
#williammorris #williammorrisdesign #williammorrisfabric #williammorrisfabrics #floralfabric #fabricstack #strawberrythief #yorkshirebusiness #independantbusiness #florals #floraldesigner #victoriandesign
Always learning new napkin folds- anyone fancy a tutorial on how to make this little cutlery napkin jacket? 🍴🫶🏻 We’ve been using Willow Bough green and blue together on the table lately and we LOVE them together! 🌿 what do you think? Would you put them together on your table? ☺️
•
•
•
#willowbough #williammorrisdesign #williammorrisfabric #williammorris #williammorrisprint #florals #peony #peonyseason #tablescape #napkinfolding #napkinholder #tabledecor
These blooms 😍 We absolutely adore this design Charlotte Rose, it’s from our French archive that we lovingly restored to its former glory and bring out all year round for on the table- we paired it here with our Willow Bough green tablecloth and the greens and pinks go together so well 🫶🏻
•
•
•
#frenchdesign #frenchfloral #frenchdesign #charlotterose #florals #tablescape #tabledecor #williammorrisdesign #williammorris #willowbough
Cut this wonderful fabric stack yesterday 🫶🏻 All these beautiful Morris florals together in our heavyweight fabrics 🪡🧵
•
•
•
#williammorris #williammorrisdesign #williammorrisfabric #williammorrisfabrics #fabrics #fabricdestashuk #fabricstack
Our biggest summer sale alert! ‼️ Fancy 20% off our entire website?✨ Including our timeless Morris Strawberry Thief licensed design and everything else in our collection, just use code; floralsummer at checkout, hurry, it ends on the 7th July 🫶🏻
•
•
•
#williammorris #williammorrisfabric #williammorrisfabrics #williammorrisdesign #williammorrisdesigns #strawberrythief #preraphaelites #victoriandesign #madeinengland #printedintheuk #summersale
One of our favourite Morris quotes 🫶🏻
•
•
•
#williammorris #williammorrisdesign #williammorrisfabric #williammorrisfabrics #morris #willowbough #quotes #quotestagram #quotestoliveby #quotes #floral #floraldesign
Enjoying peony season with some fresh blooms 🫶🏻
•
•
•
#williammorris #williammorrisdesign #williammorrisfabric #williammorrisfabrics #fabric #willowbough #peonies #peony #florals #floraldesign #florallove
Breakfast featuring Strawberry Thief taking pictures whilst waiting for the toast to pop! 🍓
•
•
•
#williammorrisdesign #williammorris #williammorrisfabric #fabric #fabrics #strawberrythief #strawberrythiefprint #victoriandesign #victorian #tablescapes #tablesettings #floraltable #floraltablescape
The simple things in life- a coffee and biscuit in the garden with some flowers 🌷 swipe for a little someone who is all ears when the word biscuit is mentioned 😅🍪
•
•
•
#williammorris #williammorrisdesign #williammorrisfabric #williammorrisfabrics #pimpernel #morrisflorals #florals #garden #floralgarden #florals #victorian
Can’t go on holidays without our Strawberry Thief windbreak to huddle behind! ⛱️ We upcycled this using the posts from our old one, if you’ve got one hanging about the garden shed, the how-to is on our blog so you can craft your own using our William Morris fabrics that we sell by the half metre 🫶🏻
•
•
•
#williammorris #williammorrisdesign #williammorrisfabric #williammorrisfabrics #fabric #upcycle #upcycledfurniture #upcycleproject #windbreaker #beachcraft #crafting #fabricstash #strawberrythief
Bertie’s been loving Bridgerton and thought he’d pose with the wisteria wearing his Daisy cravat 😉
•
•
•
#williammorris #williammorrisdesign #daisy #williammorrisfabric #williammorrisfabrics #fabric #fabrics #williammorristextiles #preraphaelite #preraphaelitebrotherhood #fabricstore #bridgerton
When the audio accurately sums up how you feel about a design 🫶🏻 Beautiful Sweet Briar was first designed in 1912, we love the sweet little pink flowers in the climbing rose stems 🌹 This licensed Morris design is now back in stock, let us know if you’d like a sample! ✨
•
•
•
#williammorris #williammorrisfabric #williammorrisfabrics #fabric #fabricstash #ukfabric #ukprinting #floralfabric #preraphaelite #floraldesign #floraldesigner
Our William Morris Willow Bough green placemats are now back in stock! ✨ They’re a beautiful addition to the table for every meal time 🫶🏻
•
•
•
#williammorris #williammorrisdesign #williammorrisfabrics #fabric #placemats #tablescape #floraltable #preraphaelite #floralhome
